How do I create a live event?
You can live stream using our online video platform. Currently this option is only available in our larger packages due to the additional cost it incurs. Please get in touch.
Assuming live streaming is enabled for your account, you can use either our Video API or our dashboard to create a new live stream.
If using our dashboard, you should see an option to create a new live stream in the top-right corner. Give your stream a name. Expand the panel below that field to provide more details. We recommend uploading a thumbnail image else your stream will appear as a black rectangle when loaded. A .jpg file that’s 1920x1080 and under 100KB is ideal.
Click the button to proceed. That will take a few moments to set up.
On the right of the page, below the player, you should see its embed code (that’s if you would like to show it to your own site). Of course currently the stream is offline and so there will be nothing to play.
Your streaming applicatiion (such as OBS) will ask you for a stream URL and key. Below the player you should see a blue link to get those. You should see two values: a URL like rtmps://example.com/app and a secret key like random_stream_key_here. Treat that stream key like a password. Anybody that knows it can stream to your account!
Configure OBS
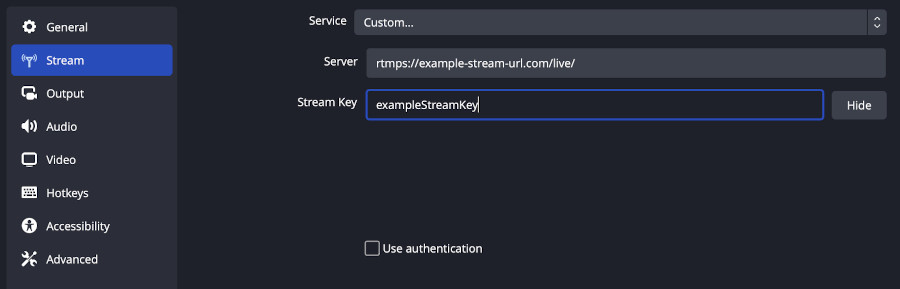
If you are using OBS, click the Settings button and then on the Stream tab. Choose “Custom…” for the Service. The Server is the stream URL. The Stream Key goes below it, as shown in the image below:
We’ll now check the settings.
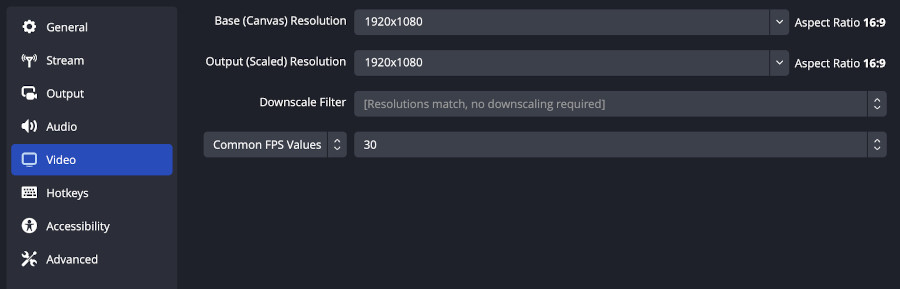
You can see here in the Video panel we are going to output a full HD (1920x1080) stream:
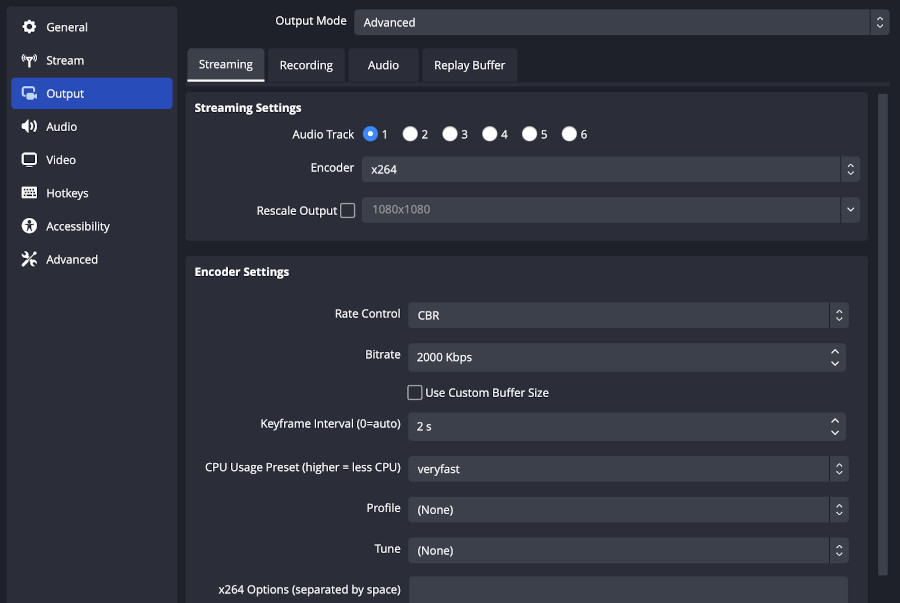
In the Output panel we’ve used these settings:
- x264 for the Encoder
- CBR (Constant BitRate) for the Rate Control
- 2000 Kbps for the Bitrate (we support up to 3500 Kbps however your stream will be disconnected if you go above that and so we recommend using at most 3000 Kbps to avoid that)
- 2 seconds for the Keyframe Interval
General configuration
Most streaming applications use sensible defaults. In general:
-
For video, use the H264 codec (at the Main level). We support resolutions up to full HD (1920x1080). Common sizes are 720p (1280x720) and 1080p (1920x1080). The framerate should be either 30fps or 60fps.
-
For audio, use the AAC (LC) codec. The bitrate should be between 96k and 320k, and the sample rate either 44.1Khz or 48Khz. Use 2 (stereo) channels.
-
Use CBR (Constant BitRate), not VBR (Variable BitRate), as it provides a more consistent connection and avoids spikes in bitrate. If the bitrate spikes too much, your stream will be disconnected.
-
The interval between keyframes (GOP) should be either 2 or 4 seconds. Longer intervals can improve efficiency however the trade-off is increased latency. We recommend using 2 seconds.
-
Use closed GOPs (this is the default in most applications, like OBS).
-
Use progressive signal flows. That will result in greatly improved quality and avoid motion artifacting. Avoid using interlaced video.
-
We support streams up to 8 hours in duration. Beyond that, disconnect for at least double the length of your reconnect window and start a new stream.
-
Make sure your internet connection is sufficiently fast for the bitrate you are streaming at. If it’s not, your stream will stall. This can be a problem with wifi so we recommend using a wired connection.
-
Make sure your application reconnects automatically if the connection drops. OBS should, however other software like FFMPEG will not. If your connection ends, after a set reconnect window (usually around 30 seconds) we will assume your stream has ended and proceed to archive it to an on-demand video.
Start streaming
In OBS choose a window/input. Click the grey button to start the stream. After a few seconds you should see a green square in the bottom-right corner to show the stream is connected and healthy.
If that square turns orange or red, try reducing the Bitrate value (as shown in the image above) to one your connection can support.
Started streaming?
At this point you should be producing a live stream from somewhere (OBS, FFMPEG, or another application).
Switch back to our dashboard or the player URL. It can take up to 30 seconds for the first segments to appear so please be patient. At that point you should see a red “live” overlay to appear in the top-right corner of the player. That red overlay shows the player has detected a valid stream URL. If it still shows as offline after a couple of minutes there is likely a fault. We suggest disconnecting, waiting a minute, then trying again.
When you see a red “live” overlay you should be able to click play. If you are testing streaming using your own screen, you will probably want to mute the player to avoid audio feedback circulating back to OBS.
End stream
At some point, end your stream. To do that in OBS, click the grey button to end stream. With FFMPEG, you can simply end the process (normally with Ctrl+C).
We’ll then wait a moment (based on a set reconnect window, normally around 30 seconds) before considering the stream ended.
The event will be archived and added as a video on-demand within a few minutes. You are then free to edit its settings, just like any other video (its title, tags, thumbnail, and so on).
New stream?
You can re-use the same stream ID, URL and key for your next live stream. Your streaming application will already be configured.
Updated: September 25, 2023