How do I configure single sign-on (using SAML)?
As an enterprise video hosting platform, we support single sign-on using SAML2 (Security Assertion Markup Language) for our larger clients. After following the steps in this tutorial your users will be able to sign-in to the Vidbeo video CMS without having to provide us with a password. All authentication is handled by your identity provider. The only data we need to know about each user is their email address since that is how our platform identifies them.
In this tutorial we are using JumpCloud to authenticate our users, however the process should be similar for the identity provider that you are using. SAML is a standard method of authentication and so much of the information asked for will be common to most identity providers.
Note: If you are using Windows Server’s Active Directory (AD & ADFS), we have written a separate guide explaining How do I configure single sign-on (using ADFS)? that you should read instead.
The aim
At the end of this process, your users will be able to sign-in to manage your private video hosting without needing to enter a password in our dashboard.
Prerequisites
SAML server You will need an identity provider that supports SAML 2.0. You can build an in-house SAML server, or use one of the commercially available solutions such as those from Okta, Centrify, JumpCloud or PingIdentity.
Email attribute Each of your users in your identity provider needs to have an email address attribute defined since that is how our platform identifies them. Some directories only require a name so make sure there is an email address too.
Notes
Your identity provider may need to know the hashing algorithm we use. It is SHA-256.
Get started
Start by signing in the Vidbeo online video platform using your email address and password. You need to have the role of owner (a super-user). If you have been tasked with configuring single sign-on then it is likely you already have been granted this access. You should see an option for Identity providers in the main menu, likely under the More menu.
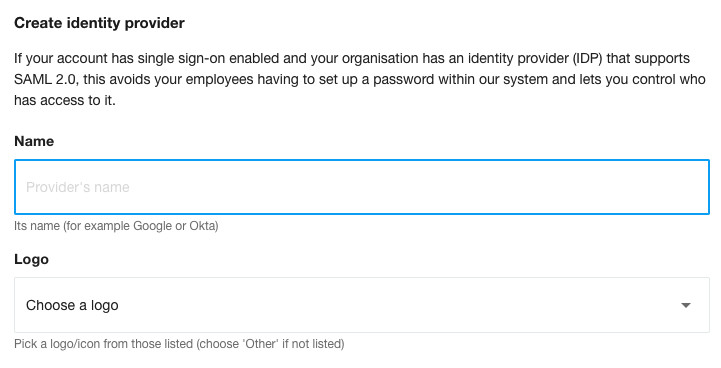
Click the link to add a new identity provider.
Give it a name - such as JumpCloud - and choose a logo, if one is listed. We ask for a logo just in case we need to list multiple identity providers:
We’ll now need some details from your identity provider. And your identity provider will need some details from us. Since it is eaiest to provide the details to both service provider and identity provider in parallel, we recommend having two browser tabs/windows open. One for our dashboard, and the other for your identity provider’s dashboard. That way you can easily switch between them without having to endlessly sign out and back in again.
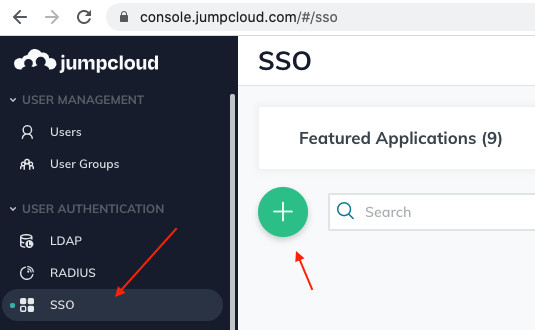
So if you haven’t already, switch to your other browser tab/window and there, sign in to your identity provider. So here, that is JumpCloud.
Click on SSO in their left-hand menu. You should see a screen to add a new SSO app. Click on that green ’+‘:
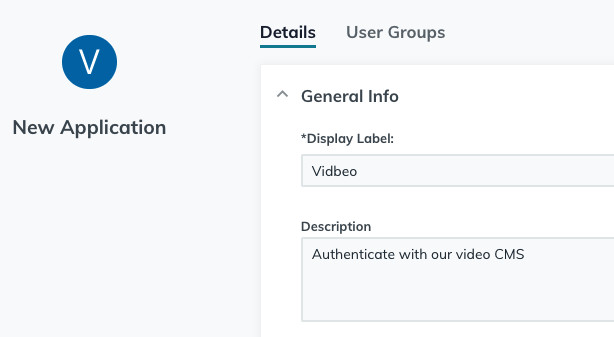
Then at the bottom, click on the button to create a ‘Custom SAML app’:

Give this new app a suitable name/description:
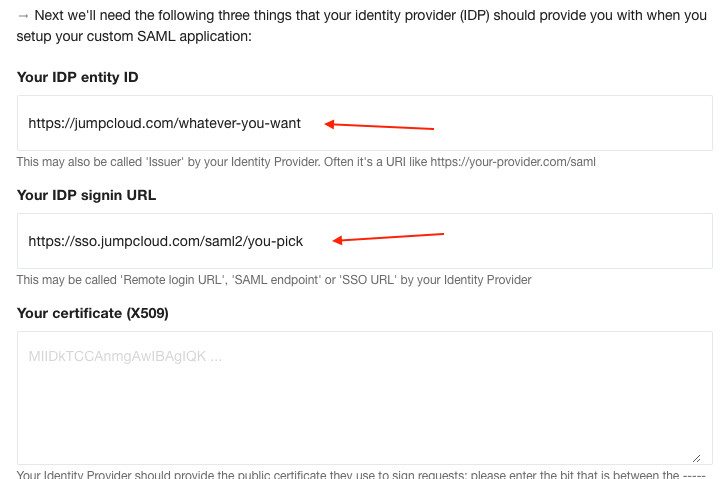
You will next see an ‘Upload metadata’ button where you can upload our metadata BUT you can’t do that because we can’t generate that metadata until you have provided the details we need (from your identity provider). And (of course) currently you haven’t. So instead you’ll need to copy the URLs across from our CMS manually. So ignore that button and move on to the next input. That input asks you to enter an IdP entity ID. Some providers will set this for you so you won’t have a choice. JumpCloud lets you pick your own. So enter whatever you like. Something vidbeo-related that you can recognise:
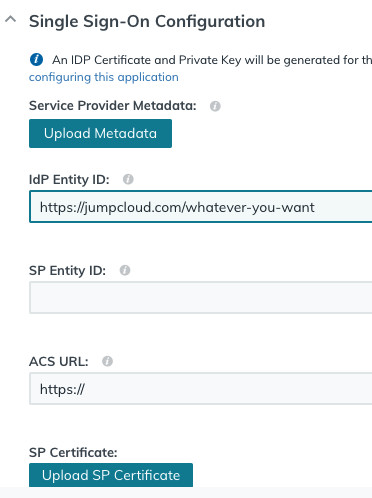
As you can see above, the next two things JumpCloud asks you for are the SP Entity ID, the ACS URL and the SP Certificate.
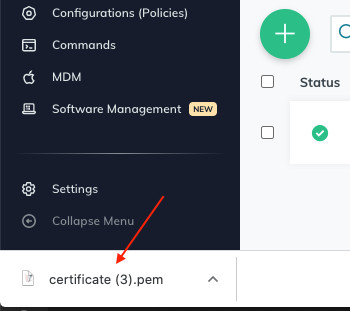
You get all three of these values from our form you were just looking at in our video CMS. Switch browser tab/window and scroll down our form. The Entity ID and ACS URL (aka Signin URL) are shown on that screen. They may be the same. And our certificate can be got by clicking on the link we provide:
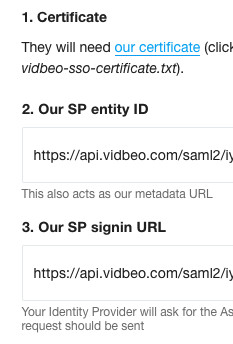
Copy the two URLs in to those SP Entity ID and ACS URL inputs in JumpCloud’s form. And click the button to ‘Upload SP Certificate’ (choosing the certificate you just downloaded from our form). You should see a success notification.
Scroll down JumpCloud’s form and it then asks about what data it should send in the SAML2 response. You want to send a user’s email. Make sure the NameID is as shown, as urn:oasis:names:tc:SAML:1.1:nameid-format:emailAddress, and that the algorithm used is SHA256. Like this:

Skip over the next few inputs. You can leave them blank.
The next one of interest is the IDP URL. JumpCloud lets you pick your own. Other providers will set one for you. Pick something sensible to use:

You now have two of the three missing values in our identity provider form.
So before you carry on down the JumpCloud form to choose any custom attributes, we recommend you take this opportunity to copy those two values you have chosen to our form so that we know about them, while they are in mind. Switch browser tab/window and copy over the value for the IdP Entity ID and the IDP URL you see in the JumpCloud form to our form:
There is still a gap for the certificate so you can’t click ‘Save’ just yet. JumpCloud haven’t made you a certificate (yet). So leave the form open and switch your browser tab/window back to JumpCloud to carry on with its form.
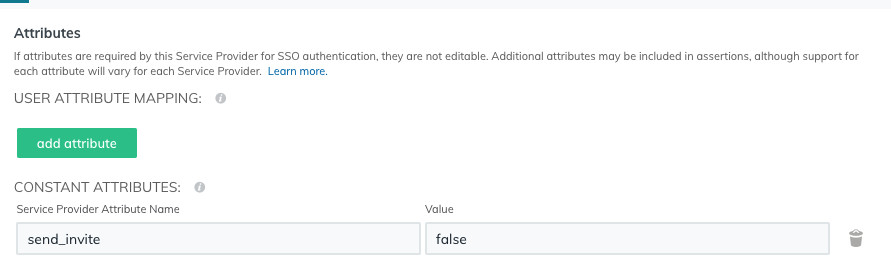
The final (optional) step is providing custom attributes. Again, most single sign-on providers will let you send custom attributes.
You may like to send name (as the user’s name). Since of course our system only gets sent their email by default, as the NameID in the SAML response.
You may like to send role. That would be one of our set roles (owner, admin, uploader or viewer). If not sent, we default to viewer. That lets the user view content but not edit it. As an account owner you can upgrade their role later on if they need to be able to modify content, so don’t worry if you do not define their role here.
We also support another, custom attribute. Again, this is optional. It’s send_invite. That attribute is used if you don’t want the user to sign-in to our dashboard. Why might this be useful? Well it’s intended for when you want to authenticate a viewer for watching your protected (private) videos using single sign-on. So if you do send the custom attribute send_invite as false, like this:
… then, as its name suggests, we won’t send an invite to sign in to the platform to their email address (which confirms their email is valid and their consent). Since all we are doing is authenticating them. That lets them watch private videos without creating a user account in our system.
With that decision about Attributes (if any) made, you are now ready to click the green Activate button in the bottom-right of the JumpCloud form. Click it, and ‘Continue’ on the subsequent pop-up (about the IDP URL not being editable).
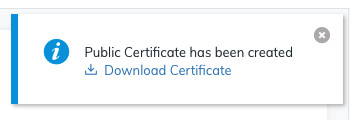
After a few seconds, you custom SAML application should be created. In the top-right of JumpCloud it should show you a link to get its certificate. Left-click once on that link to download it:
Of course what this next bit looks like depends on your browser/OS, but on Chrome you will see a grey bar in the bottom left with that PEM file having downloaded (to the Downloads folder):
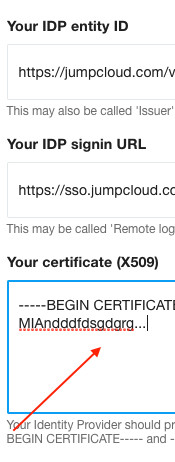
If you remember that certificate is the third of the three values we needed in our form. You now have it. So get all its content. It’s just a long text file, starting
-----BEGIN CERTIFICATE-----
Switch back to our form in your tab/window, and paste that certificate into our form, into that still-empty third input we were waiting on:
Now you have provided us with all three values we needed.
So scroll down to the bottom of our form, click the blue ‘Save’ button, and hopefully you should see a green notification that your identity provider has been updated with those three values you have just provided us with. If you want to double-check they are correct, click on the little pencil icon to the right of its name on the Identity providers page. You should see the form now has those three values (entity ID, signin URL and certificate) set.
There is one more thing to do in your identity provider …
User access
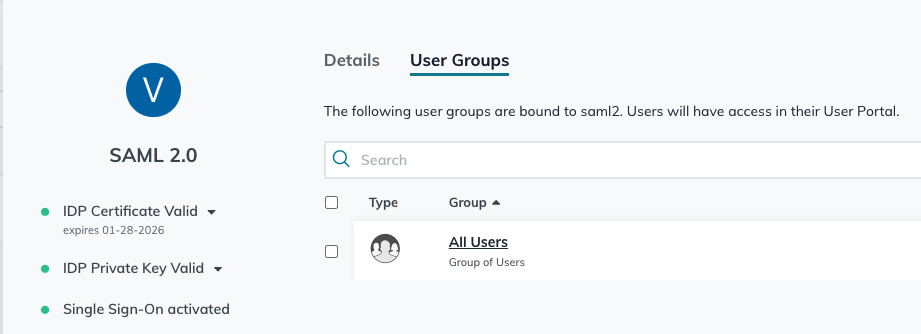
It’s up to you which users within your organisation you give access to the Vidbeo platform to. That’s outside the scope of this article. So for this demo, our application is available to all users:
Test it
Now to test it is set up correctly you have two options: service-provider initiated sign-in, or identity-provider initiated sign-in. It really depends on how you intend to use it. We’ll briefly explain both approaches below.
Note: You can’t sign in using single sign-on using that email address that you have set as an account owner. Why? Because that email is set to use a password to authenticate. Each account needs at least one owner that uses a password in case there is ever an issue with your identity provider (as you would need a password to be able to sign in to our system wiith super-user level access in order to update or replace that identity provider). So to test your SAML is correctly set up, you’ll need to use another user from your identity provider. Even if you just make a test person, like [email protected], and then delete that person from your provider/directory afterwards.
Start by signing out of the vidbeo CMS (from the top-right avatar, there is a sign-out link).
And also sign out of your identity provider. In this example you would have been signed in as a JumpCloud administrator user in order to add the custom SAML application. So again, that wouldn’t be a true test of a user’s experience.
Identity-provider initiated sign-in
Start from the user-portal sign-in page https://console.jumpcloud.com/login:
Type in your chosen test user’s email address and password.
Assuming you have given this user access to this custom SAML application in the JumpCloud dashboard, they will see it in their applications panel (called whatever you decided to call it):
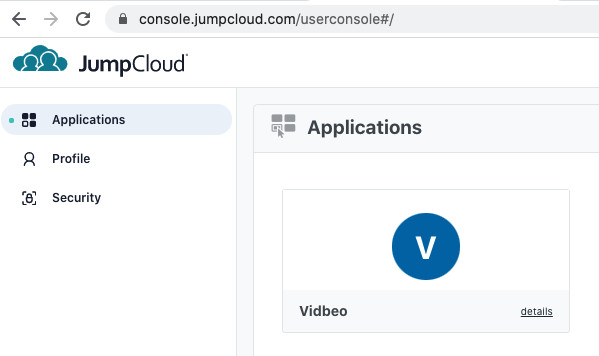
They simply need to click on it.
If they are signing in to our dashboard for the first time, we will send them an invite by email to confirm their email address and their consent. We’ll show that message on screen.
They are then asked to authenticate. If they are not signed in to the identity provider, they would be prompted to do so here. But of course they are already, and so they are redirected to the dashboard’s home page.
Since we didn’t specify a role in the attributes, this new user is created with the role of viewer. As such, all they can do is watch videos by clicking on the thumbnails. If you want this user to be given the ability to modify content (and so see the full menu of options, like you see), as explained above you will need to upgrade their role. Which you can do as an account owner later on in our video CMS.
Subsequent clicks on the application from the JumpCloud applications page won’t need that step, naturally. The user is known to the system, with a confirmed email address, and so they are taken straight to their home page. You can check that if you sign out and repeat the process. This time, no invite email is sent and so the sign-in happens with just one click.
Service-provider initiated sign-in
You might initially assume you can go to our sign-in page https://dash.vidbeo.com/signin and type in the address of your test user. But that won’t work (to begin with). Why not? Our system does not recognise that email address. It has no way of knowing which URL to send the single sign-on request to. As such it returns an error.
The only way that can work is if it does know the URL of your identity provider to send the sign-in request to (using SAML). It can … in one of two ways:
- The user has already been created in our system and has been set to be authenticated using single sign-on (naturally). So you can do that in advance if you like. As then, when they type in their email address, the system does know which URL to send the request to.
- Via a private video. How? Well, the system knows which account each video belongs to. And so if set to prompt the viewer to authenticate when showing a private video (using a player setting, of
authenticate_prompt=sso) then, when that button is clicked by the viewer, a SAML request can be initiated. And that SAML request is sent to the identity provider’s URL. Which the system knows, as it knows which account that video belongs to. And so that way, a viewer can watch a private video while authenticated using single sign-on. It’s a great option for enterprise video clients. You can set that within a custom player (in the dashboard, under More > Players).
And that should be it.
As you can see, the process of configuring single sign-on does take quite a long time, however once it is done it is much more convenient for your users and gives you far greater control over their access to our system.
As ever, if you have any questions about this, or any other aspect of our enterprise video hosting, please don’t hesitate to email [email protected]
Updated: September 25, 2023